> For the complete documentation index, see [llms.txt](https://docs.decisionrules.io/doc/llms.txt). Markdown versions of documentation pages are available by appending `.md` to page URLs; this page is available as [Markdown](https://docs.decisionrules.io/doc/~/changes/VuchuDyabVa3NSXAKjpZ/tutorials/code-editor.md).
# Create Simple Scripting Rule
This tutorial will walk you through the creation of a simple Scripting Rule.
## How to create a simple decision table
Let's advance one step at a time.
### 1. Log in
Becoming a superhero is a fairly straightforward process. After entering our [login page](https://app.decisionrules.io/auth/login), you will be able to pass your credentials and log in.
There are multiple options for user login. If you do not have an account yet, you can [create one](https://app.decisionrules.io/auth/register?type=true-registration). After logging in to the application, the[ Dashboard](/doc/~/changes/VuchuDyabVa3NSXAKjpZ/welcome.md) will be displayed.
### 2. Go to Create rule
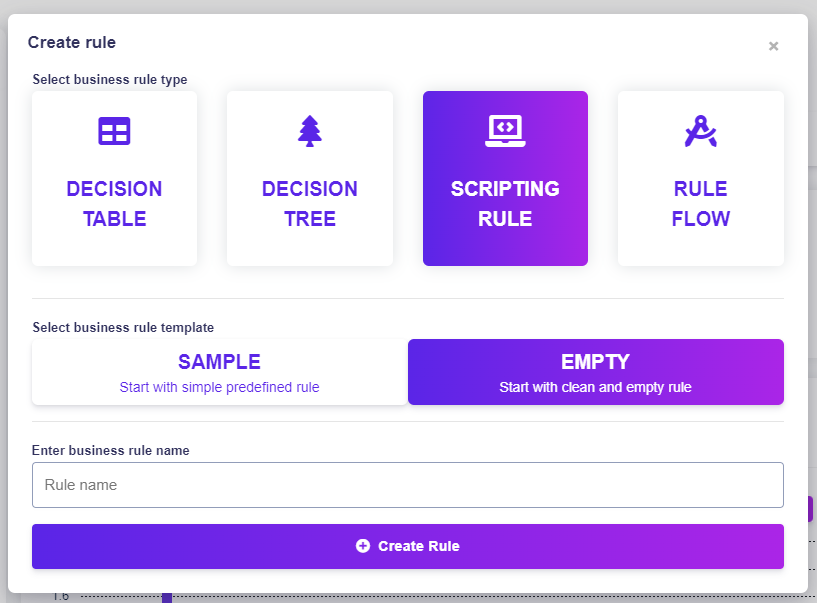
To display the rule creation pop-up click the button on the sidebar.
### 3. Create a new Scripting Rule
You will be prompted to provide a name and choose between **SAMPLE RULE** or **EMPTY RULE.** For now, name the rule as you wish and choose the EMPTY RULE. The new rule will be created and its detail will be displayed. We will continue in the Rule Settings tab.
### 4. Set scripting rules information
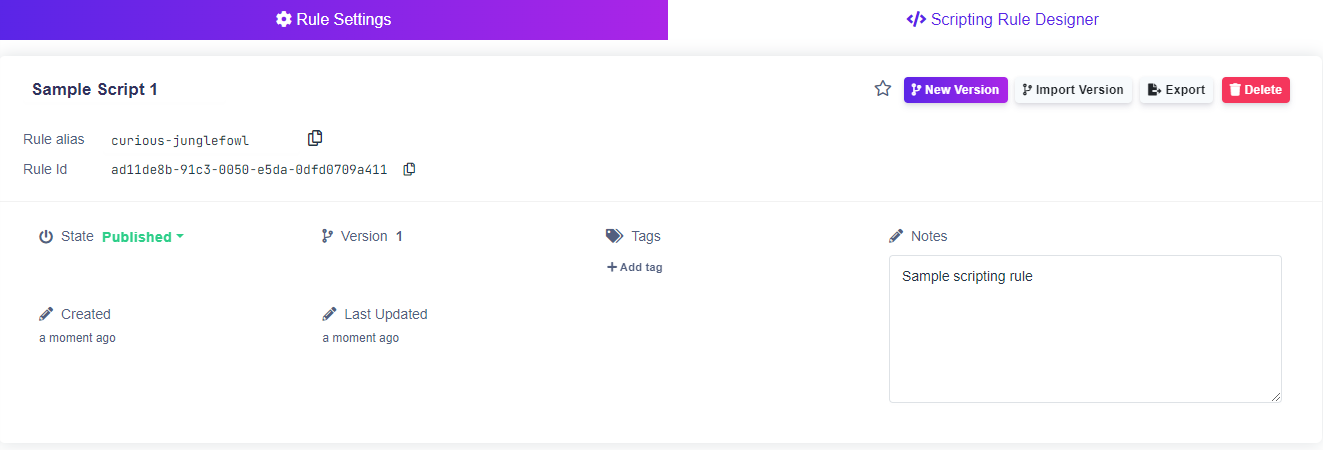
When you click on RULE SETTINGS on the top left corner, the scripting rule's detail will appear first to set some information. We will change the name of our script. To do this, click on it's name, enter one you like and press Enter.
Since we do not want this decision table to be available yet, we will change its status to **"Pending"**. To do this, click on the current status **"Published"** and then select **"Pending"**.
### 5. Create an Input and Output model
We will now create an input and output model, which we will then use to set conditions and results. We create this model with a **JSON editor**.
{% hint style="info" %}
After creating an input or output model, we must always confirm the changes with the .png?alt=media\&token=ef1c03fc-7811-4592-8675-f0d038eed037) button.
{% endhint %}
#### **Input model**
First, we delete all created objects. Then we will add our specified requirements (**value1, value2**) as empty objects.
{% hint style="info" %}
Because our model is simple, these objects do not contain any others. For more complex models, more information is [here](/doc/~/changes/VuchuDyabVa3NSXAKjpZ/decision-tables/input-and-output/json-editor.md).
{% endhint %}
#### **Input model Example:**
```javascript
{
"value1": {},
"value2": {}
}
```
#### **Output model**
We set the output model similarly, where we set it as root **result** (empty object).
**Output model Example:**
```javascript
{
"result": {}
}
```
### 6. Creating rules
Now let's move on to code editor by clicking on **Scripting Rule Designer** it in the right upper corner and create individual rules.
{% hint style="success" %}
Our code editor is based on **Monaco Editor,** using its features, like autocomplete, syntax highlight, line numbers, etc.
**Shortcut Keys** are also working, but you need to be with a cursor in the editor.
**CTRL/CMD + S** - save
**CTRL/CMD + R** - run
**CTRL/CMD + Z** - undo
**CTRL/CMD + SHIFT + Z** - redo
**CTRL/CMD + F** - find
**SHIFT + ALT + F** - format
{% endhint %}
{% hint style="success" %}
Scripts must be written in **JavaScript** language.
{% endhint %}
For simplicity, we will remove the code from the code editor to create a new rule.
When to code editor is empty, we can start to create our own rule in **JavaScript.** It is straightforward, and you need to write your code which can look like below.
{% hint style="success" %}
Input must always be entered as input.yourInputVariable.
Output must always be entered as output.yourOutputVariable.
To return an output, always enter **return output** at the end of your script!
{% endhint %}
{% hint style="info" %}
**console.log()** is forbidden due to performance, but you can use **log()** instead.
{% endhint %}
{% hint style="success" %}
You can use **log()** to print values in the console, which is at the bottom of the code editor.
{% endhint %}
```javascript
/*
1. Input variables
Input body is set in input variable
*/
let a = input.value1;
let b = input.value2;
/*
2. Define simple "multiply" function
*/
function multiply(a, b) {
return a * b;
}
/*
3. Execute multiply function and store value result variable
*/
let resultMultiply = multiply(a, b);
/*
4. Set output model which is returned in REST API
*/
output.result = resultMultiply;
/*
Optionally: It is possible print values to console
*/
log('Result multiply:', resultMultiply);
/*
5. Return output
*/
return output;
```
{% hint style="info" %}
Always **save** your script using  (bottom of the page) or CTRL/CMD + S
{% endhint %}
### 7. Test created scripting rule
{% hint style="warning" %}
Don't forget to save your scripting rule!
{% endhint %}
Now we can test our rule. Before testing the rule, we must change the status of the rule to **"Published"**.
If we want to test a rule, we can click on the  icon at the bottom of the page. An input and output window will show up at the bottom of the page.
{% hint style="success" %}
You can find more information about input and result at [Solver API](/doc/~/changes/VuchuDyabVa3NSXAKjpZ/api/rule-solver-api.md).
{% endhint %}
We can either click on the run button between input and output windows or  the button on the top of the code editor. The result will be displayed in the **Output window (the right one)**.
{% hint style="info" %}
The debug mode can be turned on by clicking on  . In scripting rules, it will enable to write **log()** in the console.
{% endhint %}
#### Request body example:
```javascript
{
"value1": 2,
"value2": 4
}
```
#### Response body example:
```javascript
{
"result": 8
}
```
{% hint style="info" %}
More information about Test Bench is [here](broken://pages/-MN5Ss1ULMHsu4C-PG4E).
{% endhint %}
---
# Agent Instructions
This documentation is published with GitBook. GitBook is the documentation platform designed so that both humans and AI agents can read, navigate, and reason over technical content effectively. Learn more at gitbook.com.
## Querying This Documentation
If you need additional information that is not directly available in this page, you can query the documentation dynamically by asking a question.
Perform an HTTP GET request on the current page URL with the `ask` query parameter, and the optional `goal` query parameter:
```
GET https://docs.decisionrules.io/doc/~/changes/VuchuDyabVa3NSXAKjpZ/tutorials/code-editor.md?ask=&goal=
```
`ask` is the immediate question: it should be specific, self-contained, and written in natural language.
`goal` is optional and describes the broader end goal you are ultimately trying to accomplish on behalf of the user. GitBook uses it to tailor the answer towards what is most useful for that goal.
The response will contain a direct answer to the question and relevant excerpts and sources from the documentation.
Use this mechanism when the answer is not explicitly present in the current page, you need clarification or additional context, or you want to retrieve related documentation sections.


 button on the sidebar.