AWS ECS/Fargate
This article goes over the deployment process for On-Premise solution of DecisionRules using AWS Fargate.
This tutorial uses MongoDB for it's database, we're going to secure this connection using VPC peering. If your use-case doesn't call for strict security you can allow your MongoDB to be accessible from anywhere and skip this step, lowering the difficulty and making the deployment itself faster.
Following steps might differ depending on your level of security and sofistication of your existing AWS environment.
Note: It is possible to follow this tutorial without prior AWS experience although basic AWS knowledge is recommended.
Prerequisites and Recommendations
To follow this article successfully you will need the following things:
An active AWS account.
Sufficient permissions as specified in the
AdministratorAccessIAM policy. This includes abilities to create service roles and manage AWS resources.A Mongo Atlas account with a database created.
List of Topics
Below are the steps our deployment will follow.
The Deployment
1. Provisioning a VPC
Begin with creating a Virtual Private Cloud (VPC) in the AWS Management Console. The VPC serves as the foundational network environment for your application.
Select Create VPC and choose VPC and more.
Choose to deploy to 2 AZs and for simplicity we're going to create a VPC without private subnets. Choose None for NAT gateways and VPC endpoints.
Importantly choose Enable DNS hostnames and resolution.
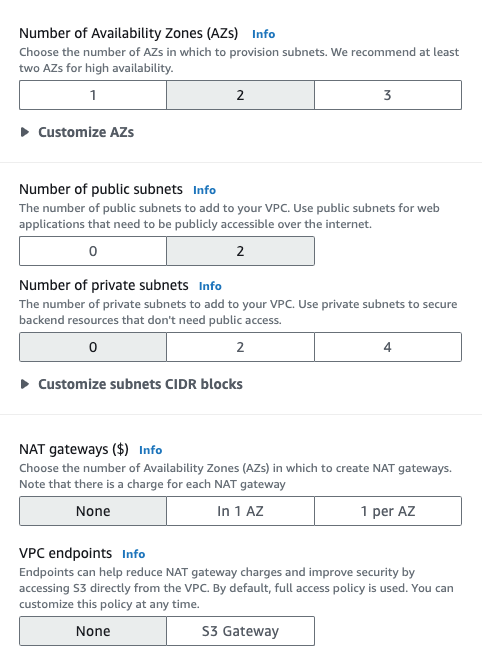
Check your settings and hit Create VPC.
Creating needed Security groups
Navigate to VPC / Security / Security groups and click Create security group. Give your security group a name and choose your newly created VPC in the selection box.
Now depending on your level of security you might want to specify where the traffic may flow into your app from. For the purposes of this tutorial however I choose to allow traffic from anywhere using the HTTP, HTTPS and SSH types.

2. Provisioning ElastiCache
This part is the same as when deploying to Amazon Elastic Kubernetes Service. All of the necessary information on the provisioning itself and the cache's settings can be found in our Cache - Amazon ElastiCache article.
3. Peering Mongo Atlas into the VPC
For your Mongo Atlas database to be able to communicate with your Fargate application you're going to have to peer the database's VPC to your VPC. To do so, navigate to your Mongo Atlas account and under Security / Network Access / Peering click Add peering connection. Choose AWS as your Cloud provider and fill in the information required (Account ID, VPC ID, VPC CIDR and region). Once you've clicked Initiate Peering it will only take a couple of minutes until AWS asks for approval of the new peering connection.
To approve the connection navigate to VPC / Virtual private cloud / Peering connections. You should see a connection Pending acceptance. Select it and under Actions click Accept request.

4. Creating the ECS Cluster
Navigate to the Amazon ECS section in the AWS Console and hit Create cluster.
Give your cluster a name and keep the rest of the settings default (make sure AWS Farget is enabled in the Infrastructure window).
5. Creating Load Balancers
We're going to be creating three Load Balancers. One for the Server, one for the Client and (optionally) one for the Business Intelligence app. These will serve as entry points to the containers of our app. For each of the Load Balancers the procedure is very similar.
Open EC2 Dashboard: Go to the Load Balancers section in the EC2 dashboard.
Select Load Balancer Type: Choose between Application Load Balancer (ALB) or Network Load Balancer (NLB)
Configure Settings: Define load balancer name, VPC, and security groups.
Create a Listener target group: Under Listeners and routing click Create target group
Target type: IP Addresses
Protocol: NLB - TCP or ALB - HTTP
VPC: Your created VPC
Below is a table with the necessary settings for each Load Balancer.
LB Type
NLB
ALB
NLB
Scheme
Internet-facing
Internet-facing
Internet-facing
LB VPC / Target group VPC
Your project VPC
Your project VPC
Your project VPC
Target group - target type
IP Addresses
IP Addresses
IP Addresses
Target group - Protocol:Port
TCP:80
HTTP:80
TCP:80
6. Creating Task Definitions
Access Task Definitions in ECS: In the ECS console, choose 'Task Definitions' and 'Create new Task Definition'.
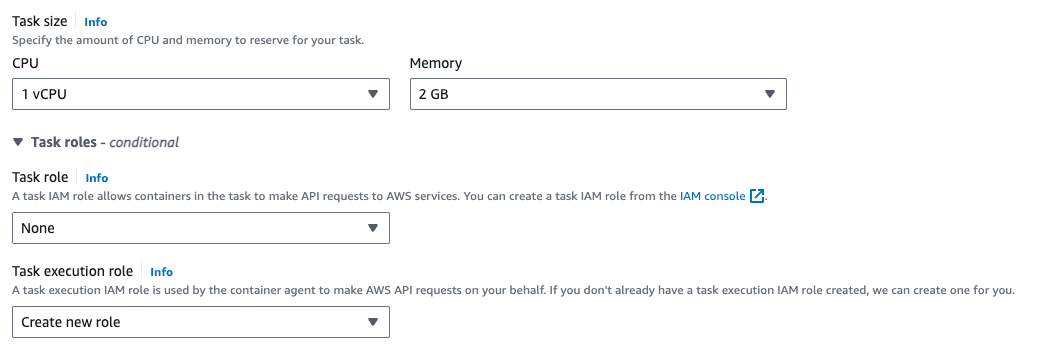
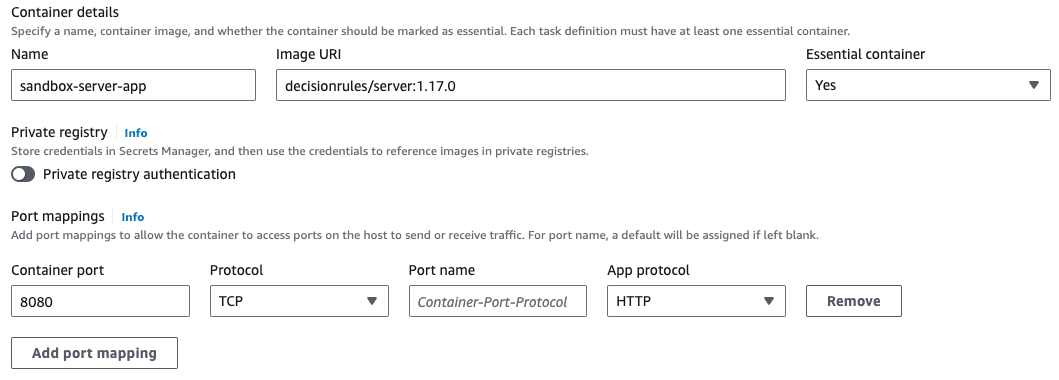
Configure Task: Give your task a name and select the Fargate launch type. Define the task with container specifications, including Docker image, CPU, memory, health-checks.
Below is a table of settings for each container
Minimum requirements
1 vCPU; 2 GB Memory
0.25 vCPU; 0.5 GB Memory
1 vCPU; 2 GB Memory
Task role*
None
None
None
Task execution role
Create new role
Create new role
Create new role
Container name
Any
Any
Any
Image URI
decisionrules/server:<YOUR_PREFFERED_VERSION>
decisionrules/client:<YOUR_PREFFERED_VERSION>
decisionrules/business-intelligence:<YOUR_PREFFERED_VERSION>
Protocol
TCP
TCP
TCP
Port
8080
80
8082
* - You can define Task roles that fit your use case
The rest of the settings can be kept default or set up in a way that fits your use case - except for the HealthCheck setting. Set the HealthCheck Command field for each Task to their corresponding string listed below.
Interval
30
Timeout
5
Start period
30
Retries
3
Environment variable
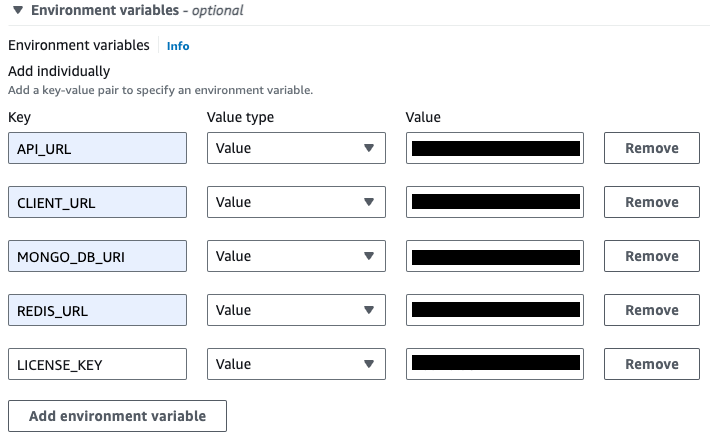
An important part of creating Task definitions is providing each Task definition with necessary environment variables. Each of the containers (Server, client and BI) have a set of mandatory environment variables that have to be provided for your application to run properly. Read about them here.
Set up DocumentDB TLS certificate
If you are using DocumentDB, which needs to define a TLS CA certificate for communication. Without this certificate, the server application will not connect.
There are 2 options how to insert this certificate into the container.
Create a custom container from our server container, which will also contain a .pem file
Define the Docker configuration in the Task definition
How to define the Docker configuration
Entry point
Command
Set MONGO_TLS_CA_FILE env var
The MONGO_TLS_CA_FILE environment variable specifies on which path the TLS CA certificate occurs.
If you are using Docker configuration to define the certificate, the value of this env variable is:
7. Creating the Services
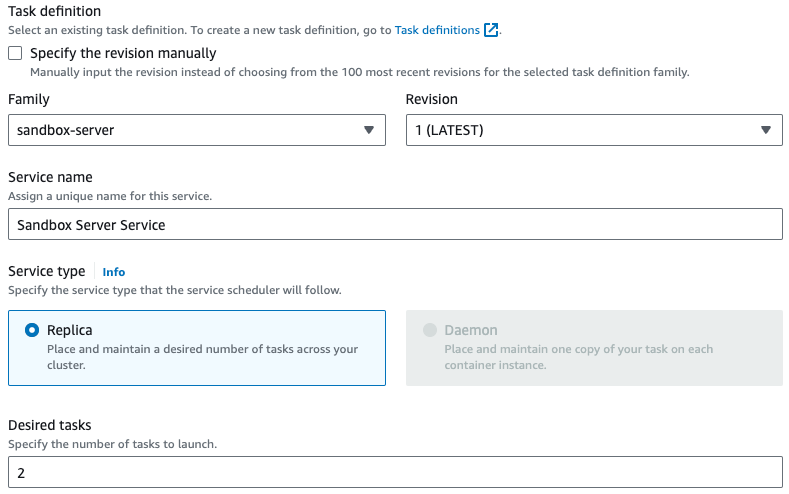
Navigate to your previously created cluster and under Services click Create. Select your Task which you would like to create the Service for, give it a name, and under Desired Tasks i recommend you input atleast 2.
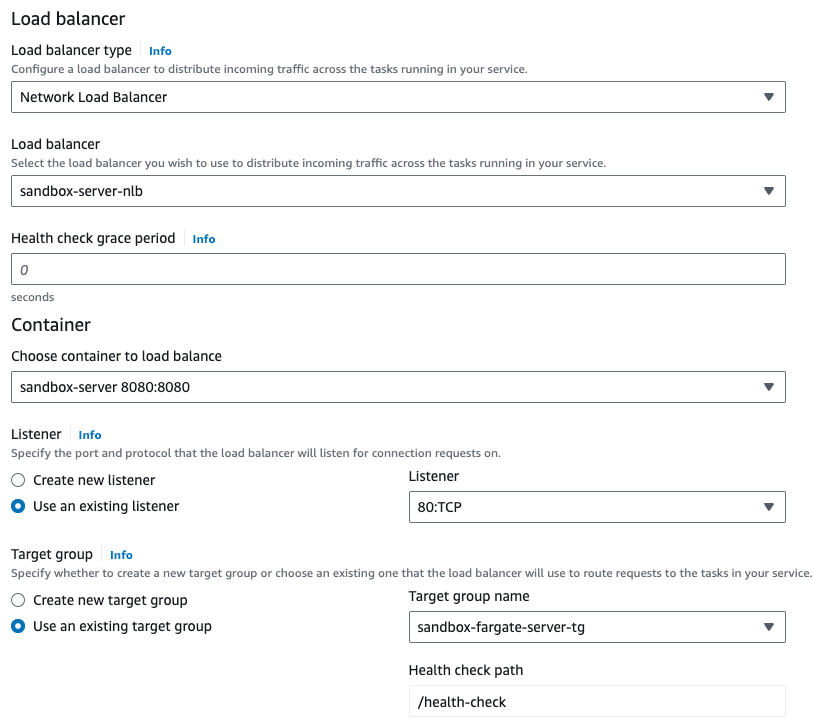
Next in the Networking section choose your VPC, it's subnets and the your custom security group. In the Load Balancing section choose the Load Balancer you've created specifically for the service you're creating (i.e.: Server NLB for the Server service etc.) and importantly set the Health check grace period to 30 seconds. Next in the Listener part of your Networking settings choose Use an existing listener and pick the one you'd created previously. When creating the Server or BI services, fill in the Health check path with '/health-check', leave it empty for the client container.
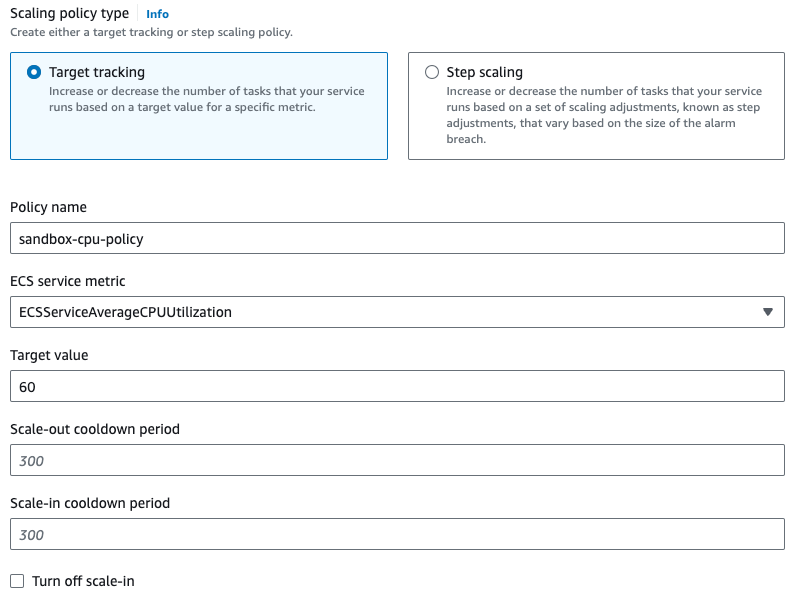
Lastly the Service auto scaling section. This is especially important for use cases which an be expected to put a significant load unto the server. I would recommend setting it to minimum of 2, maximum of 10 tasks. For the policy use ECSServiceAverageCPUUtilization and set the target value depending on your use case.
8. Accessing the Application
Locate Load Balancer DNS Name: Once the service is active, go to the EC2 dashboard, find your client load balancer, and note its DNS name.
Test the Application: Enter the load balancer’s DNS name in a web browser to access your deployed application.
9. Additional Steps
Create SSL/TLS Certificates: Using AWS Certificate Manager (or a 3rd party service) and your DNS provider it is recommended you create certificates for each of the load balancer's DNS names. This way you can use your custom domain as an entry point into the application as well as have the connection secure.
Set Up Monitoring: Use Amazon CloudWatch to monitor your application's performance and set up alarms.
Implement Security Measures: Ensure your AWS resources are secured with proper security groups and IAM roles.
Backup and Recovery Plans: Establish strategies for data backup and disaster recovery for your application and databases.
Conclusion
This tutorial provides a comprehensive pathway for deploying a DecisionRules application on AWS Fargate. Each step, from establishing network infrastructure to making the application accessible, plays a vital role in ensuring a successful cloud deployment.
Notes: This guide is intended for informational purposes. Users should refer to the latest AWS documentation for any recent updates or changes to the service offerings or procedures.
Was this helpful?

